Defining Defects#
A persistent challenge with organizing computational defect data is the ambiguity with which a defect simulation is defined. The standard practice is to simulate the isolated defects by using a larger simulation to create an isolated defect and then using charge-state corrections to approximate the properties of a defect in the dilute limit. This means that the same defect can be simulated with different simulation cells. Ideally, if you want to build a computational defects database that lasts many years, you cannot rely on user-supplied provenance to aggregate the data. You must have the external method for tracking whether two calculations are for the same defect.
A core concept in this package is that a defect is defined independently of the simulation cell.
All of the information about which defect we are simulating is captured by the Defect object.
A point defect is defined by the Wigner-Seitz unit cell representation of the bulk material stored as a structure attribute and a site attribute that indicates where the defect is in the unit cell.
Different kinds of point defects all subclass the Defect objects which gives easy access to functions such as generating a cubic simulation supercell.
As along as the database or any algorithm keeps track of this Defect object, you can just use simple structure matching to find out if two simulations represent the same defect.
Basic Example Using GaN#
from pathlib import Path

TEST_FILES = Path("../../../tests/test_files")
from pymatgen.analysis.defects.core import DefectComplex, Substitution, Vacancy
from pymatgen.core import PeriodicSite, Species, Structure

bulk = Structure.from_file(TEST_FILES / "GaN.vasp")
if (
    bulk.lattice == bulk.get_primitive_structure().lattice
):  # check that you have the primitive structure
    print("The bulk unit cell is the unique primitive WS cell")
The bulk unit cell is the unique primitive WS cell
Since the two Ga sites are equivalent the Mg substitution we derive from both should be equivalent.
ga_site0 = bulk.sites[0]
ga_site1 = bulk.sites[1]
n_site0 = bulk.sites[2]
n_site1 = bulk.sites[3]

mg_site0 = PeriodicSite(Species("Mg"), ga_site0.frac_coords, bulk.lattice)
mg_site1 = PeriodicSite(Species("Mg"), ga_site1.frac_coords, bulk.lattice)
mg_ga_defect0 = Substitution(structure=bulk, site=mg_site0)
mg_ga_defect1 = Substitution(structure=bulk, site=mg_site1)
if mg_ga_defect0 == mg_ga_defect1:
    print("The two Mg_Ga defects are equivalent.")
The two Mg_Ga defects are equivalent.
Equivalence here is determined using the standard StructureMatcher settings.
    def __eq__(self, __o: object) -> bool:
        """Equality operator."""
        if not isinstance(__o, Defect):
            raise TypeError("Can only compare Defects to Defects")
        sm = StructureMatcher(comparator=ElementComparator())
        return sm.fit(self.defect_structure, __o.defect_structure)
If you are in the situation where your lattice parameters have changed overtime (i.e. by inclusion of different functionals) you might consider using more custom maching between the defect.
Since the defect equivalence is only determined by the defect_structure field, all defects can be compared using __eq__.
vac_defect0 = Vacancy(structure=bulk, site=mg_site0)
vac_defect1 = Vacancy(structure=bulk, site=n_site0)
vac_defect2 = Vacancy(structure=bulk, site=n_site1)
if vac_defect0 != vac_defect1:
    print(
        f"The two vacancies {vac_defect0.name} and {vac_defect1.name} are not equivalent."
    )

if vac_defect2 == vac_defect1:
    print(
        f"The two vacancies {vac_defect2.name} and {vac_defect1.name} are equivalent."
    )
The two vacancies v_Ga and v_N are not equivalent.
The two vacancies v_N and v_N are equivalent.
Defining Defect Complexes#
Defining defect complexes can be done by providing a list of defect objects generated using the same pristine structure.
def_comp0 = DefectComplex(defects=[mg_ga_defect0, vac_defect1])
def_comp1 = DefectComplex(defects=[mg_ga_defect1, vac_defect1])
def_comp2 = DefectComplex(defects=[mg_ga_defect1, vac_defect2])
The defect_structure for each complex is shown below.
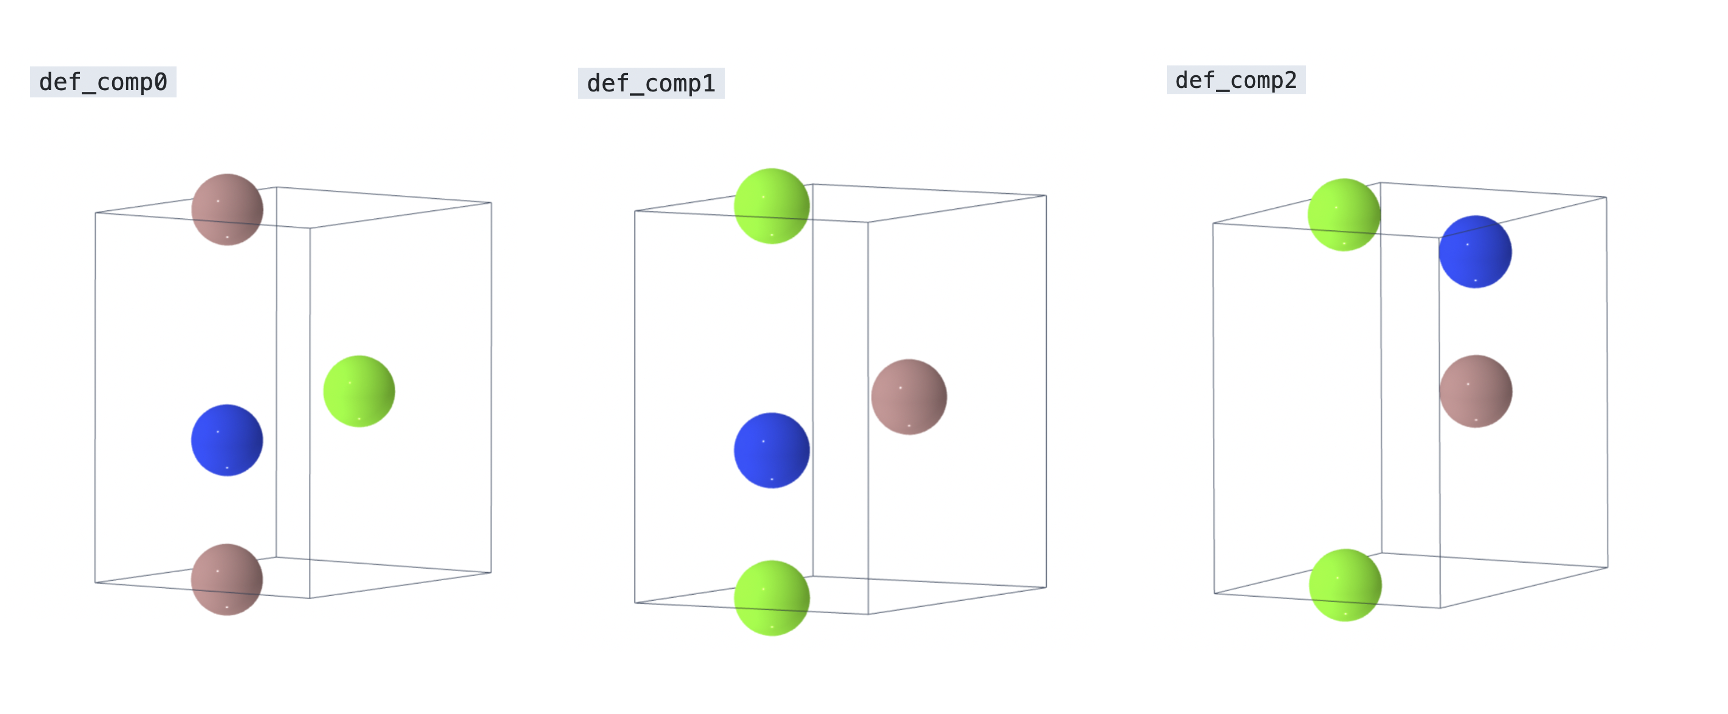
By inspection, def_comp0 and def_comp2 appear symmetrically equivalent to each other at first and distinct from def_comp1.
However, there are two distinct Mg_Ga+V_N complexes in the structure:
One where the two parts of the defect complex are nearest neighbors (
def_comp0).One where the two defects are next-nearest neighbors (
def_comp2).
Since our defect complex definition accounts for an effective Center of Mass site, we can properly account for periodic boundary conditions. the two defect complexes will be considered not equal.
For complexes, we recommend checking the structure with the center of mass (defect_structure_with_com) to make sure you understand exactly what will be simulated in the supercell.
assert def_comp0 != def_comp2
assert def_comp0 != def_comp1
Obtaining the Simulation Supercell#
The simplest way to generate a supercell for simulating the defect is to just call the get_supercell_structure method for the defect.
Note that, under the hood, the get_supercell_structure method first attempts a “quick and dirty” inversion of a large cube in the bases of the lattice parameters.
If a valid supercell is not discovered this way, ASE’s find_optimal_cell_shape will be called to exhaustively search for the best supercell structure.
sc_struct = mg_ga_defect0.get_supercell_structure()
sc_struct.num_sites
128
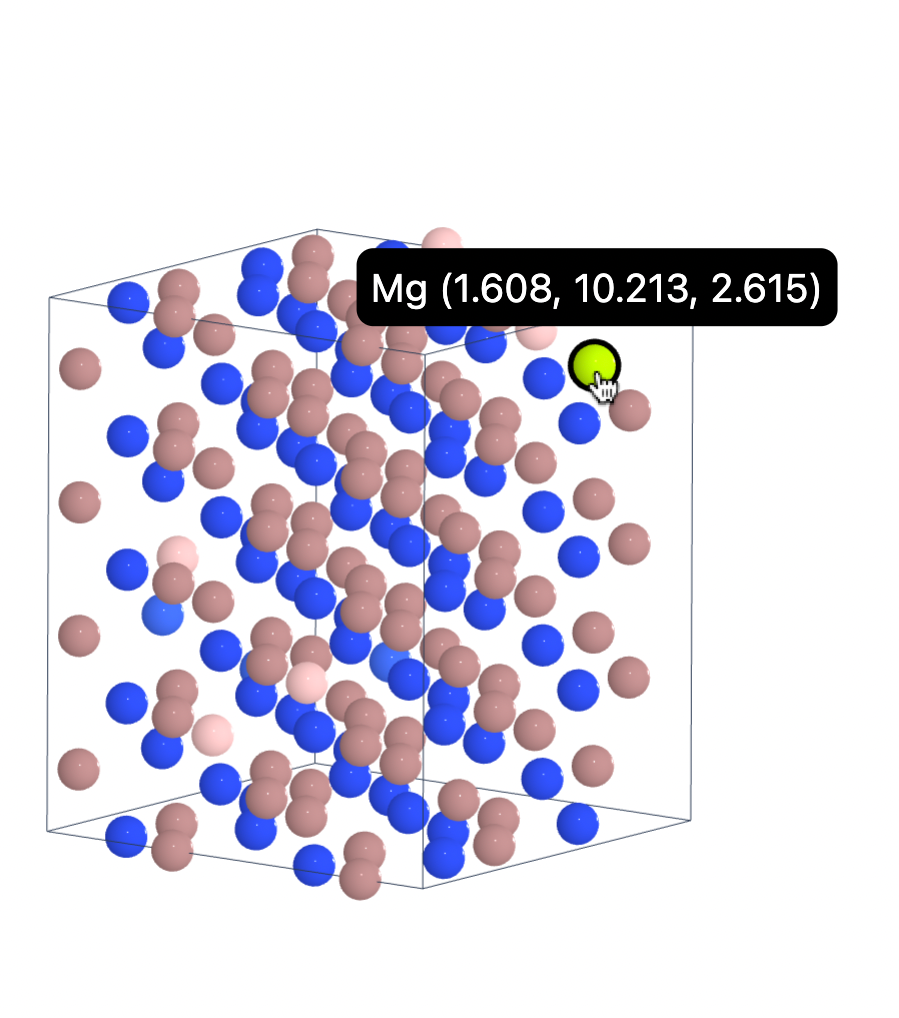
The supercell generated with default settings looks like this:
You can also reduce the max_atoms field to obtain a smaller simulation cell.
Note that in this case, the conditions for the for cubic cell cannot be satisfied by the lattice vector inversion approach and the more expensive algorithm from ASE will be used. Uncomment the following cell to see this in action.
# sc_struct_smaller = mg_ga_defect0.get_supercell_structure(max_atoms=100)
# sc_struct_smaller.num_sites
Generating Defects#
Intersitial defects are usually hard to define due to a lack of reference points for the site.
Extensive symmetry can be done to identifiy highly symmetric sites in the structure for interstitial insertion.
However, the recommended method to create interstitial defects is to use the ChargeInterstitialGenerator which analyzes the charge density to identify interstitial sites. The code snippet to generate the interstitial sites is given below.
For more details on how the intersitial site identification works, check out this paper.
from pymatgen.analysis.defects.generators import (
    ChargeInterstitialGenerator,
    generate_all_native_defects,
)
from pymatgen.io.vasp import Chgcar

chgcar = Chgcar.from_file(TEST_FILES / "CHGCAR.Fe3O4.vasp")
cig = ChargeInterstitialGenerator()
for defect in cig.generate(chgcar, insert_species=["H"]):
    print(defect)
H intersitial site at [0.00,0.00,0.00]
H intersitial site at [0.38,0.38,0.38]
You can geneate all native defects in an atomic structure using the generate_all_native_defects function.
for defect in generate_all_native_defects(chgcar):
    print(defect)
Fe Vacancy defect at site #0
Fe Vacancy defect at site #1
Fe Vacancy defect at site #3
O Vacancy defect at site #6
O Vacancy defect at site #7
Fe subsitituted on the O site at at site #6
Fe subsitituted on the O site at at site #7
O subsitituted on the Fe site at at site #0
O subsitituted on the Fe site at at site #1
O subsitituted on the Fe site at at site #3
O intersitial site at [0.00,0.00,0.00]
O intersitial site at [0.38,0.38,0.38]
Fe intersitial site at [0.00,0.00,0.00]
Fe intersitial site at [0.38,0.38,0.38]
If you have access the to materials project charge density API, you can obtain the data from the API directly:
from mp_api.client import MPRester
with MPRester() as mpr:
    chgcar = mpr.get_charge_density_from_material_id("mp-804")

for defect in generate_all_native_defects(chgcar):
    print(defect)