Dynamic Workflows
In this tutorial, we’ll explore how to:
pass information between FireWorks in a Workflow
define Firetasks that automatically create more FireWorks that depend on the output of the task
This tutorial can be completed from the command line, but basic knowledge of Python is suggested. In this tutorial, we will run examples on the central server for simplicity. One could just as easily run them on a FireWorker if you’ve set one up.
A workflow that passes job information
The first thing we will examine is a workflow that passes job information - namely the name, fw_id, and launch_dir (run directory) of a parent Firework to its child. Often, the run directory of the parent is needed by the child (e.g., to copy files from the parent job to the child job). Although FireWorks has a powerful framework for passing arbitrary information between jobs through the FWAction object (which we will begin to cover in the next example), passing basic job information can be done more simply by simply setting the _pass_job_info reserved keyword spec to True. Let’s look at this in more detail.
Move to the
dynamic_wftutorial directory in your installation directory:cd <INSTALL_DIR>/fw_tutorials/dynamic_wf
The workflow is encapsulated in the
printjob_wf.yamlfile. Look inside this file. Like last time, thefwssection contains a list of Firework objects:
fw_id#1 looks a lot like the FireWorks we’ve seen before. It is aScriptTaskFiretask that prints out a message (This is the first Firework) to the terminal. The one thing to notice, however, is that there is now a_pass_job_infokey which is set to True. So theScriptTaskhas been instructed to pass job information. Important note: The_pass_job_infokey can be set for any Firetask; there is nothing special aboutScriptTaskin this regard.
fw_id#2 is unfamiliar - it references aPrint Job Taskcustom Firetask. There is nothing special about this Firetask, except that we will be using it to print out the information that was passed by FW #1.The section labeled
linksconnects these FireWorks into a workflow in the same manner as in the first workflow tutorial.
Let’s try adding this workflow to our database. We’ll go over the details of how everything is working as we run the Workflow:
lpad reset
lpad add printjob_wf.yaml
Next, let’s use the rapidfire mode with
--nlaunchesset to 1 to run just the first Firework in this Workflow (the ScriptTask):rlaunch -s rapidfire --nlaunches 1
Up until now, things should be pretty familiar. However, remember that this first FireWork had set
_pass_job_infoto True. This is an instruction to update thespecof all children jobs with some runtime information of this job. Let’s examine our child job to see if anything is different:lpad get_fws -i 2 -d all
The output should look something like this:
{
    "name": "Unnamed FW",
    "fw_id": 2,
    "state": "READY",
    "created_on": "2015-09-08T23:23:11.913700",
    "updated_on": "2015-09-08T23:23:30.607863",
    "spec": {
        "_tasks": [
            {
                "_fw_name": "Print Job Task"
            }
        ],
        "_job_info": [
            {
                "fw_id": 1,
                "launch_dir": "fireworks/fw_tutorials/dynamic_wf/launcher_2015-09-08-23-56-27-593424",
                "name": "Unnamed FW"
            }
        ]
    }
}
The key thing to notice in the output above is the presence of a
_job_infokey. We didn’t put that there in our Workflow; it was added automatically by FireWorks after the first job ran! Thus, the child job now has access to information about the previous job in itsspec._job_info. Note that this key is an array, and if there were several steps in the Workflow we could chain together information from the entire history of jobs.Let’s now run the second job and see what happens:
rlaunch -s rapidfire --nlaunches 1
Examining the output, it seems the second job (the
Print Job Task) was able to print out information about the first job. You can examine the custom Firetask by looking in the fileprintjob_task.py. Remember that the code that gets executed is therun_task()method:def run_task(self, fw_spec): job_info_array = fw_spec['_job_info'] prev_job_info = job_info_array[-1] print(f"The name of the previous job was: {prev_job_info['name']}") print(f"The id of the previous job was: {prev_job_info['fw_id']}") print(f"The location of the previous job was: {prev_job_info['launch_dir']}")
It should be clear from examination how this code is working. First, it is inspecting the
_job_infokey (remember, even though we did not set the value of this key it was created and populated automatically because the previous job had set the_pass_job_infokey to True in the_fw_spec). Next, we are taking the last item in this array since there could be information about multiple previous jobs in this key. Finally, we are printing out the information about the job. We could similarly use the information aboutlaunch_dirto copy files or perform other tasks.
A workflow that passes data
Apart from job info, other information can also be passed between Fireworks in a Workflow. Let’s imagine a workflow in which the first step adds the numbers 1 + 1, and the second step adds the number 10 to the result of the first step. The second step doesn’t know in advance what the result of the first step will be; the first step must pass its output to the second step after it completes. The final result should be 10 + (1 + 1) = 12. Visually, the workflow looks like:
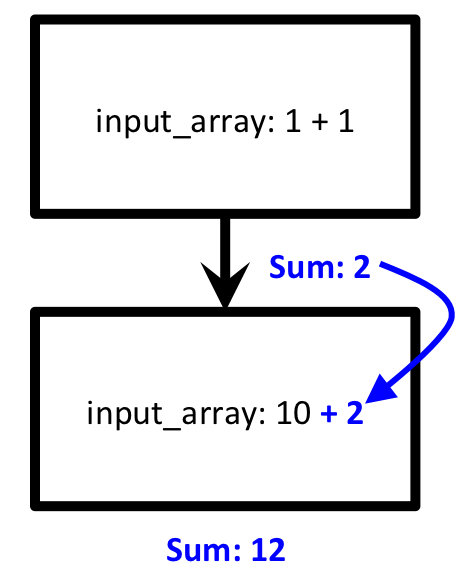
The text in blue lettering is not known in advance and can only be determined after running the first workflow step. Let’s examine how we can set up such a workflow.
Move to the
dynamic_wftutorial directory in your installation directory:cd <INSTALL_DIR>/fw_tutorials/dynamic_wf
The workflow is encapsulated in the
addmod_wf.yamlfile. Look inside this file. Like last time, thefwssection contains a list of Firework objects:
fw_id#1 looks like it adds the numbers 1 and 1 (defined in the input_array) within anAdd and ModifyFiretask. This is clearly the first step of our desired workflow. Although we don’t yet know what theAdd and ModifyFiretask is, we can guess that it at least adds the numbers in the input_array.
fw_id#2 only adds the number 10 thus far. Without knowing the details of theAdd and ModifyFiretask, it is unclear how this Firework will obtain the output of the previous Firework. We’ll explain that in the next step.The second section, labeled
links, connects these FireWorks into a workflow in the same manner as in the first workflow tutorial.
We pass information by defining a custom Firetask that returns an instruction to modify the workflow. To see how this happens, we need to look inside the definition of our custom
Add and ModifyFiretask. Look inside the fileaddmod_task.py:
Most of this Firetask should now be familiar to you; it is very similar to the
Addition Taskwe investigated when Creating a custom Firetask.The last line of this file, however, is different. It reads:
return FWAction(stored_data={'sum': m_sum}, mod_spec=[{'_push': {'input_array': m_sum}}])The first argument, {‘sum’: m_sum}, is the data we want to store in our database for future reference. (We’ve explored this before when Creating a custom Firetask). It does not affect this Firework’s operation.
The second argument, mod_spec=[{‘_push’: {‘input_array’: m_sum}}], is more complex. This argument describes a list of modifications to make to the next Firework’s spec using a special language.
The instruction {‘_push’: {‘input_array’: m_sum}} means that the input_array key of the next Firework(s) will have another item pushed to the end of it. In our case, we will be pushing the sum of (1 + 1) to the
input_arrayof the next Firework.
The previous step can be summarized as follows: when our Firetask completes, it will push the sum of its inputs to the inputs of the next Firework. Let’s see how this operates in practice by inserting the workflow in our database:
lpad reset
lpad add addmod_wf.yaml
If we examined our two FireWorks at this stage, nothing would be out of the ordinary. In particular, one of the FireWorks has only a single input,
10, and does not yet know what number to add to10. To confirm:lpad get_fws -i 1 -d all lpad get_fws -i 2 -d all
Let’s now run the first step of the workflow:
rlaunch -s singleshot
This prints out
The sum of [1, 1] is: 2- no surprise there. But let’s look what happens when we look at our FireWorks again:lpad get_fws -i 1 -d all lpad get_fws -i 2 -d all
You should notice that the Firework that is
READY- the one that only had a single input of10- now has two inputs:10and2. Our first Firetask has pushed its sum onto theinput_arrayof the second Firework!Finally, let’s run the second step to ensure we successfully passed information between FireWorks:
rlaunch -s singleshot
This prints out
The sum of [10, 2] is: 12- just as we desired!
You’ve now successfully completed an example of passing information between workflows! You should now have a rough sense of how one step of a workflow can modify the inputs of future steps. There are many types of workflow modifications that are possible, including some that involve a simpler (but less flexible) language than what we just demonstrated. We will present details in a different document. For now, we will continue by demonstrating another type of dynamic workflow.
Workflows that pass files
You can also pass files between Fireworks, either manually (using the job information or data passing methods above combined with a Firetask to copy files) or using the built-in keywords _files_in and _files_out. More details are presented here.
A Fibonacci Adder
You may not know in advance how many workflow steps you require to achieve a result. For example, let’s generate all the Fibonacci numbers less than 100, but only using a single addition in each Firework. It’s unclear how many additions we’ll need, so we can’t set up this workflow explicitly.
Instead, we will start with a single Firework that contains the start of the sequence (0, 1). This Firework will generate the next Fibonacci number in the sequence by addition, and then generate its own child Firework to carry out the next addition operation. That child will in turn generate its own children. Starting from a single Firework, we will end up with as many FireWorks as are needed to generate all the Fibonacci numbers less than 100.
A diagram of our the first two steps of operation of our Firework looks like this:
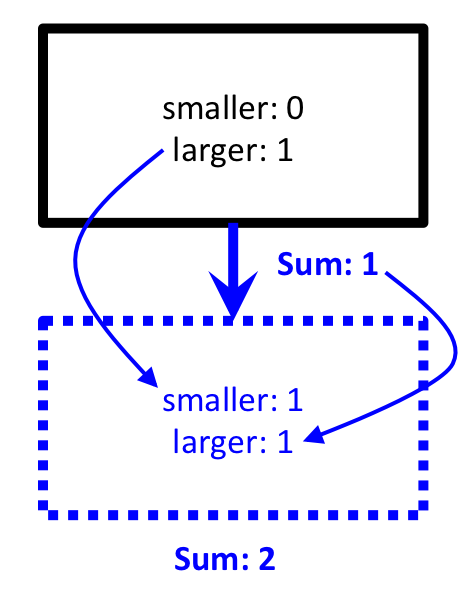
Our single Firework will contain a custom Firetask that does the following:
Given two input Fibonacci numbers (e.g., 0 and 1), find the next Fibonacci number (which is equal to their sum, in this case 1).
- If this next Fibonacci number is less than 100 (the stop_point):
Print it
Create its own child Firework that will sum the new Fibonacci number we just found with the larger of the current inputs. In our example, this would mean to create a new Firework with inputs 1 and 1.
This new Firework will output the next Fibonacci number (2), and then create its own child Firework to continue the sequence (not shown)
When the next Fibonacci number is greater than 100, print a message that we have exceeded our limit and stop the workflow rather than generate more FireWorks.
Let’s see how this is achieved:
Stay in the
dynamic_wftutorial directory in your installation directory and clear it:cd <INSTALL_DIR>/fw_tutorials/dynamic_wf rm FW.json
The initial Firework is in the file
fw_fibnum.yaml. Look inside it. However, there is nothing special here. We are just defining the first two numbers, 0 and 1, along with the stop_point of 100, and asking to run theFibonacci Adder Task.The dynamicism is in the
Fibonacci Adder Task, which is defined in the filefibadd_task.py. Look inside this file.
The most important part of the code are the lines:
new_fw = Firework(FibonacciAdderTask(), {'smaller': larger, 'larger': m_sum, 'stop_point': stop_point})
return FWAction(stored_data={'next_fibnum': m_sum}, additions=new_fw)
The first line defines a new Firework that is also a
Fibonacci Adder Task. However, the inputs are slightly changed: the smaller number of the new Firework is the larger number of the current Firework, and the larger number of the new Firework is the sum of the two numbers of the current Firework (just like in our diagram). The stop_point is kept the same.The {‘next_fibnum’: m_sum} portion is just data to store inside the database, it does not affect the Firework’s operation.
The additions argument contains our dynamicism. Here, you can add a Firework to the workflow (as shown), or even add lists of FireWorks or entire lists of Workflows!
Now that we see how our Firetask will create a new Firework dynamically, let’s run the example:
lpad reset
lpad add fw_fibnum.yaml
lpad get_fws
That last command should prove that there is only one Firework in the database. Let’s run it:
rlaunch -s singleshot
You should see the text
The next Fibonacci number is: 1. Normally this would be the end of the story - one Firework, one Rocket. But let’s try to again to get all the FireWorks in the database:lpad get_fws
Now there are two FireWorks in the database! The previous Firework created a new Firework dynamically. We can now run this new Firework:
rlaunch -s singleshot
This should print out the next Fibonacci number (2). You can repeat this until our Firetask detects we have gone above our limit of 100:
$ rlaunch -s singleshot
The next Fibonacci number is: 3
$ rlaunch -s singleshot
The next Fibonacci number is: 5
$ rlaunch -s singleshot
The next Fibonacci number is: 8
$ rlaunch -s singleshot
The next Fibonacci number is: 13
$ rlaunch -s singleshot
The next Fibonacci number is: 21
$ rlaunch -s singleshot
The next Fibonacci number is: 34
$ rlaunch -s singleshot
The next Fibonacci number is: 55
$ rlaunch -s singleshot
The next Fibonacci number is: 89
$ rlaunch -s singleshot
We have now exceeded our limit; (the next Fibonacci number would have been: 144)
If we try to run another Rocket, we would get an error that no FireWorks are left in the database (you can try it if you want). We’ll instead look at all the different FireWorks created dynamically by our program:
lpad get_fws
There are 11 FireWorks in all, and 10 of them were created automatically by other FireWorks!
A Fibonacci Adder: The Quick Way
Let’s see how quickly we can add and run our entire workflow consisting of 11 steps:
lpad add fw_fibnum.yaml
rlaunch -s rapidfire
That was quick! You might even try again with the stop_point in fw_fibnum.yaml raised to a higher value.
Note
The rapidfire option creates a new directory for each launch. At the end of the last script you will have many directories starting with launcher_. You might want to clean these up after running.
Python example (optional)
Here is complete Python code for running a Workflow that passes job info:
from fireworks import ScriptTask
from fireworks.core.firework import Firework, Workflow
from fireworks.core.launchpad import LaunchPad
from fireworks.core.rocket_launcher import rapidfire

from fw_tutorials.dynamic_wf.printjob_task import PrintJobTask

# set up the LaunchPad and reset it
launchpad = LaunchPad()
launchpad.reset('', require_password=False)

# create the Workflow that passes job info
fw1 = Firework([ScriptTask.from_str('echo "This is the first FireWork"')], spec={"_pass_job_info": True}, fw_id=1)
fw2 = Firework([PrintJobTask()], parents=[fw1], fw_id=2)
wf = Workflow([fw1, fw2])

# store workflow and launch it locally
launchpad.add_wf(wf)
rapidfire(launchpad)
Here is complete Python code for running a dynamic workflow. Note that this code is no different than running any other custom Firework - it is almost identical to the code we used to run the AdditionTask() two tutorials ago:
from fireworks import Firework, FWorker, LaunchPad
from fireworks.core.rocket_launcher import rapidfire
from fw_tutorials.dynamic_wf.fibadd_task import FibonacciAdderTask

# set up the LaunchPad and reset it
launchpad = LaunchPad()
launchpad.reset('', require_password=False)

# create the Firework consisting of a custom "Fibonacci" task
firework = Firework(FibonacciAdderTask(), spec={"smaller": 0, "larger": 1, "stop_point": 100})

# store workflow and launch it locally
launchpad.add_wf(firework)
rapidfire(launchpad, FWorker())
Next step: Learning to design workflows
You’ve now explored examples of designing many types of workflows, ranging from very simple and deterministic to quite flexible and dynamic. In the final workflow tutorial, we’ll provide some tips on mapping your computing workload into Firetasks, FireWorks, and Workflows.