This page is available as a Jupyter notebook: tutorials/1-quickstart.ipynb.
Five-minute quickstart
In this quickstart, you will:
Create some jobs.
Use the jobs in a Flow.
Run the Flow.
Examine the outputs of the Flow.
Get a flavor of the Python API
This tutorial will emphasize “hands-on” usage of jobflow and not explain things in detail.
Define jobs
The atomic building block of jobflows are jobs. Creating a job is as easy as writing a python function. All you need to do is use the @job decorator.
[2]:
from jobflow import job


@job
def add(a, b):
    return a + b
Any call to the add function will return a Job object. This is essentially a function call that will be executed later.
[3]:
add_first = add(1, 5)
Jobs have outputs that can be accessed using the output attribute. As the job has not yet been executed, the output is currently a reference to the future output.
[4]:
add_first.output
[4]:
OutputReference(74e277df-95aa-4abc-aae1-e4dd64fe4cab)
The output of a job can be used as the input to another job.
[5]:
add_second = add(add_first.output, 3)
Create a Flow
A Flow is a collection of Jobs or other Flow objects. Let’s create a Flow from the add_first and add_second jobs we just made:
[6]:
from jobflow import Flow

flow = Flow([add_first, add_second])
The order of the jobs in the input array does not matter. Their execution order will be determined by their connectivity. Because add_second takes the output of add_first as an input, the add_first will always run before add_second.
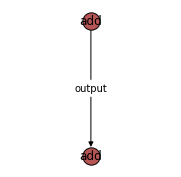
The connectivity of the jobs in a flow can be visualized using draw_graph. Note, you should install jobflow with the visualisation dependencies (pip install jobflow[vis]) to enable this feature. See the installation page for more details.
[7]:
flow.draw_graph(figsize=(3, 3)).show()
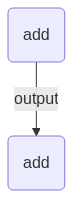
Flows can also be visualised using mermaid. To generate the mermaid plotting syntax use the to_mermaid function.
[8]:
from jobflow.utils.graph import to_mermaid

print(to_mermaid(flow))
flowchart TD
    74e277df-95aa-4abc-aae1-e4dd64fe4cab(add) -->|output| 2e5278a5-5215-407c-a928-74e2cfe20680(add)
The graph can be visualised by pasting the output into GitHub or at mermaid.live.
Run the Flow
Jobflow supports running Flows locally or on remote clusters. Below we run the Flow locally using the run_locally function.
Note
Running Flows on remote clusters can be achieved using the FireWorks package and is covered in the Running Jobflow with FireWorks tutorial.
[9]:
from jobflow.managers.local import run_locally

responses = run_locally(flow)
2023-06-08 10:04:45,612 INFO Started executing jobs locally
2023-06-08 10:04:45,615 INFO Starting job - add (74e277df-95aa-4abc-aae1-e4dd64fe4cab)
2023-06-08 10:04:45,617 INFO Finished job - add (74e277df-95aa-4abc-aae1-e4dd64fe4cab)
2023-06-08 10:04:45,619 INFO Starting job - add (2e5278a5-5215-407c-a928-74e2cfe20680)
2023-06-08 10:04:45,621 INFO Finished job - add (2e5278a5-5215-407c-a928-74e2cfe20680)
2023-06-08 10:04:45,622 INFO Finished executing jobs locally
The numbers in brackets after the job function name give the job unique identifier (UUID).
Examine Flow outputs
The run_locally function returns the output of all jobs. The format of the output is:
{
    job_uuid: {
        job_index: {
            Response()
        }
    }
}
The job_index and Response() objects are introduced in later tutorials. The main thing to know is that the Response contains the output of the Job and any other commands for controlling the Flow execution.
[10]:
responses
[10]:
{'74e277df-95aa-4abc-aae1-e4dd64fe4cab': {1: Response(output=6, detour=None, addition=None, replace=None, stored_data=None, stop_children=False, stop_jobflow=False)},
 '2e5278a5-5215-407c-a928-74e2cfe20680': {1: Response(output=9, detour=None, addition=None, replace=None, stored_data=None, stop_children=False, stop_jobflow=False)}}
We can check the output of specific jobs using:
[11]:
responses[add_first.uuid][1].output
[11]:
6
Next steps
Now that you’ve successfully run your first Flow, we encourage you to learn about all the different options jobflow provides for designing and running workflows. A good next step is the Introductory tutorial, which covers things more slowly than this quickstart.